

How to Install Tailwind CSS in Vue.js

By Emmanuel Chinonso
Technical Writer
Tailwind CSS is not the first utility-first CSS framework, but it’s safe to say it’s the most popular among developers. Using this framework is not limited to only your HTML files. You can use them together with another programming framework.
In this tailwind tutorial, we are going to look at using Tailwind CSS in VueJs. Vuejs is a popular front-end JavaScript framework. Developers can use this framework to create stunning web designs for their projects.
Table of Content
- Prerequisite
- Creating a vue.js project
- Installing Tailwind CSS
- Configuring your tailwind file
- Add the Tailwind directives to your CSS
- Building the project
- Conclusion
Prerequisite
For you to follow along, you need to have the following requirement.
- Knowledge of Vuejs
- Knowledge of npm
- Basic CSS knowledge
- Basic JavaScript knowledge
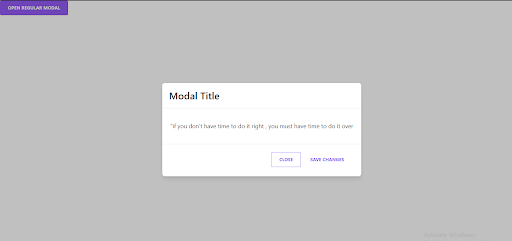
At the end of this tailwind CSS tutorial, you will be able to install Tailwind CSS in VUE.js and create a simple modal. The tailwind CSS VUE.js modal will look like the image below.

Creating Vue.js project
Creating a Vue.js project is easy. If you have not created your project yet. you can do that by opening your terminal and writing the following command.
Code:
npm init vite my-projectthese commands will start Installing the VITE. You will be prompted to choose which framework to install. You will select VUE among the options presented.
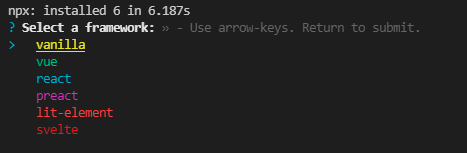
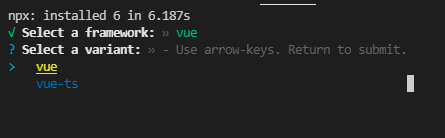
Once you have chosen the framework you want to install, You can select the variant you wish to use, just like the image below.
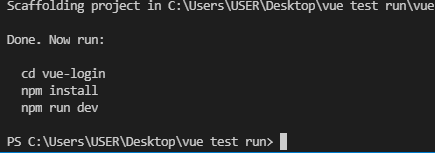
After selecting the variant of your choice, the whole framework will install. You will see the image below on the terminal.
next step is to install the dependencies using npm
Code:
npm install.Installing Tailwind CSS
At this point, we are going to install Tailwind CSS on our Vue project
Code:
npm install –D tailwindcss@latest postcss@latest autoprefixer@latestConfiguring your tailwind file
You will now have to configure some files to enable tailwind to work with the Vue project.
The first thing is to generate the tailwind.config.js and postcss.config.js files by running the following code in the terminal.
Code:
npx tailwindcss init –p.The command above will create two files. The first file,tailwind.config.js will look like the code below.
Code:
module.exports = { purge: [], darkMode: false, // or 'media' or 'class' theme: { extend: {}, }, variants: { extend: {}, }, plugins: [],};The second file is postcss.config.js.
It will already have the ‘tailwindcss’ and ‘autoprefixer’ configured and look like the code below.
module.exports = { plugins: { tailwindcss: {}, autoprefixer: {}, },};Add the Tailwind directives to your CSS
At this stage, we are going to include Tailwind CSS directives to the CSS file.
Inside the src folder, we will create a CSS file and call it index.css. You can call it anything you want. Now, we will write the following code inside.
Code:
@tailwind base;@tailwind components;@tailwind utilities;You can now save the file. Tailwind will swap the directives you have created to generate the styles based on the configuration design system.
You can now go ahead to make sure that the CSS is imported into the src/your main.js file.
Code:
import { createApp } from 'vue';
import App from './App.vue';
import './index.css';
Building the project
At this stage, we are going to now build a tailwind Vue modal to demonstrate that the Tailwind CSS is working on our vue.js project.
Below are the codes we are going to write on our App.vue file.
Code:
<template>  <div>    <button      class="bg-purple-500 text-white active:bg-pink-600 font-bold uppercase     text-sm px-6 py-3 rounded shadow hover:shadow-lg outline-none     focus:outline-none mr-1 mb-1 ease-linear transition-all duration-150"      type="button"      v-on:click="toggleModal()"    >      Open regular modal    </button>    <div      v-if="showModal"      class="overflow-x-hidden overflow-y-auto fixed     inset-0 z-50 outline-none focus:outline-none justify-center items-center flex"    >      <div class="relative w-auto my-6 mx-auto max-w-3xl">        <!--content-->        <div          class="border-0 rounded-lg shadow-lg relative flex flex-col w-full         bg-white outline-none focus:outline-none"        >          <!--header-->          <div            class="flex items-start justify-between p-5 border-b           border-solid border-blueGray-200 rounded-t"          >            <h3 class="text-3xl font-semibold">              Modal Title            </h3>            <button              class="p-1 ml-auto bg-transparent border-0 text-black opacity-5 float-right            text-3xl leading-none font-semibold outline-none focus:outline-none"              v-on:click="toggleModal()"            >              <span                class="bg-transparent text-black opacity-5               h-6 w-6 text-2xl block outline-none focus:outline-none"              >                ×              </span>            </button>          </div>          <!--body-->          <div class="relative p-6 flex-auto">            <p class="my-4 text-blueGray-500 text-lg leading-relaxed">              "if you don't have time to do it right, you must have time to do it over            </p>          </div>          <!--footer-->          <div            class="flex items-center justify-end p-6 border-t border-solid           border-blueGray-200 rounded-b"          >            <button              class="text-purple-500 bg-transparent border border-solid border-purple-500            hover:bg-purple-500 hover:text-white active:bg-red-600 font-bold uppercase text-sm px-6            py-3 rounded outline-none focus:outline-none mr-1 mb-1 ease-linear            transition-all duration-150"              type="button"              v-on:click="toggleModal()"            >              Close            </button>            <button              class="text-purple-500 background-transparent font-bold uppercase             px-6 py-2 text-sm outline-none focus:outline-none mr-1 mb-1 ease-linear              transition-all duration-150"              type="button"              v-on:click="toggleModal()"            >              Save Changes            </button>          </div>        </div>      </div>    </div>    <div v-if="showModal" class="opacity-25 fixed inset-0 z-40 bg-black"></div>  </div></template>
<script>  export default {    name: 'regular-modal',    data() {      return {        showModal: false,      };    },    methods: {      toggleModal: function() {        this.showModal = !this.showModal;      },    },  };</script>
After this, you can now run npm run dev. Then our webpage will look like the image below.
Conclusion
We have successfully installed a tailwind CSS in our vue.js project. We also created a modal with Tailwind CSS to demonstrate that the Tailwind CSS Vue is working well.
Build modern projects using Bootstrap 5 and Contrast
Trying to create components and pages for a web app or website from
scratch while maintaining a modern User interface can be very tedious.
This is why we created Contrast, to help drastically reduce the amount of time we spend doing that.
so we can focus on building some other aspects of the project.
Contrast Bootstrap PRO consists of a Premium UI Kit Library featuring over 10000+ component variants.
Which even comes bundled together with its own admin template comprising of 5 admin dashboards and 23+ additional admin and multipurpose pages for
building almost any type of website or web app.
See a demo and learn more about Contrast Bootstrap Pro by clicking here.

Related Posts
Comments
...